Powered by Blogger.
Showing posts with label Windows. Show all posts

How to Share or connect internet from Android phone to pc or laptop

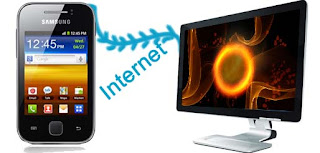
How to Share or connect internet from Android phone to laptop using usb cable To share internet from your phone to pc or laptop is very easy below are the steps how to use your phone internet using usb cable.
  • Install kies on your pc or laptop for required driver.
  • Connect your Android phone to pc or laptop using usb cable.
  • Now your phone shows that it is connected by usb in status bar.
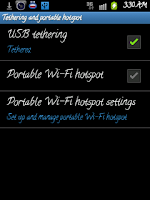
  • Go to Home > Settings > Wireless and Networks > Tethering and portable hotspot>USB tethering


Select USB tethering Now your status bar icon changes to blue and you are connected to internet on your pc or laptop start browsing.
Read More

Trace Unwanted Calls And Miscalls With "True Caller"

Trace Unwanted Calls And Miscalls With "True Caller" on android, Nokia, blackberry, iPhone and windows phones. Are you getting calls and miscalls from unknown numbers this is relay annoying so to overcome this here is a solution for you to trace or find the unknown caller before answering the call from your android, Nokia, blackberry, iPhone or windows phones.


Features:-
See Who The Unknown Caller Is Before Answering
Powerful Call Filters
Connect Your Droid To Facebook And LinkedIn

This is free application and is available on its official site for all OS based Android, Nokia, Blackberry, iPhone and Windows phones. For now it is not available on Google play

Download For Your Android Mobile Link

Download For Nokia, Blackberry, iPhone or Windows phones  Link (on phone) or Link (on pc)
Read More

Control Your Android Device From Your Browser.

Control Your Android Device From Your Browser. If you want to control your Android device right from your computer then AirDroid or Kies air allows you to do all that lke Manage calls, sms, photos, ringtones, etc.
Requirement:
wifi on pc

AirDroid
AirDroid is an application that allows Android users to enjoy an over-the-air experience by allowing them to control and manage their Android devices from a web browser.The app allows pretty much everything. You can transfer files between Android devices and computer. You can read, send, delete or rename SMS’s and even install or uninstall applications. You can do anything from the browser that you would normally do on the phone itself.
Using the tool is very easy. Just install the application and run the app. It will give you an IP address through which you can navigate and manage your Android device. Just insert that IP address in your browser URL field and you can start controlling your Android device.Download Airdroid free

Kies air:
Kies air is a application that enables you to easily manage contents saved on your device via PC internet or mobile browser using Wi-Fi technology.
Without having to connect any cables, within a browser you can use diverse function such as multimedia transfer, music listening, PIMS management, text message, file search, and so on.
Access from another mobile device (i.e. mobile B accesses mobile A);
Connect both mobile devices (A and B) to the same Access Point (Wi-Fi router).
Launch Kies Air and press "Start" button on your mobile device (mobile A).
Launch Kies Air and Shake the mobile B twice. This will start a scan for mobile A.
Allow the access request on the original mobile device (mobile A
In the case of Kies air not installed on another device (mobile B): Access with typing URL displayed by Kies air (on mobile A) in the browser on another mobile device (mobile B).
In the case of "Motion" feature not supported on another device (mobile B): Access with "Scan" button on the menu.

Access from PC/laptop;
Connect mobile device and PC to the same Access Point (Wi-Fi router).
Launch Kies Air and press "Start" button on mobile device.
Type URL displayed Kies air in the browser on PC.
Allow the access request on my mobile device.
Allow to create icon after accessing Kies air.
After creating desktop icon, you can access Kies air without typing URL using desktop icon
Download kies air free from market.

Don't forget to leave comment
Read More

Kaspersky Internet Security for windows 8 Consumer Preview free for 3 months

Download kis for windows 8 Consumer Preview free for 3 months.
"Kaspersky Lab", presents Kis Technical Preview designed for Windows 8 Consumer Preview. The product will be active for 3 months after installation . Kis Technical Preview is intended for installation exclusively on Windows Consumer Preview.


Free antivirus kis for windows 8 Consumer Preview valid for 3 months.  Download link
Read More

Download Android Apps to pc

Download Android apps to pc from Android market
Here is a simple tutorial that we created on how to download apk files directly to pc from android market thanks to dev “redphx” who make this possible.
What do you need?
Latest version of Chrome (on any OS – Windows, Linux, Mac)
Your Android Market account ID and Password.
Your Device ID (Install this app to get it or you can follow instructions given at the download link)
you will have to disable SSL error warnings on your Chrome.Follow the steps below to disable ssl error warning
Right click on Chrome shortcut, select “Properties”
Switch to “Shortcut” tab. In “Target” field, insert [space]--ignore-certificate-errors at the end. Once you have that finished, click “OK”
It will look something like this: C:\…\chrome.exe --ignore-certificate-errors
Close Chrome and open it again with that shortcut
Download APK Downloader extension from here and open with google chrome now go to customize and control google chrome > options > extensions > APK Downloader > and click on option > enter the details correctly and login. Now visit Android market and select any free application then press the APK Downloader icon on address bar.
Read More

Download Windows 8 Consumer Preview or beta

Windows 8 Consumer Preview or beta version now available
Microsoft has now released the beta or consumer preview version of windows 8.At present you can can download windows 8 in different languages the available languages are English, Chinese (Simplified), French, German and Japanese available in both 32-bit (x86) and 64-bit (x64). Now according to microsoft you can get windows 8 running on in your pc in two ways:
The first way is to download a setup file which is only 5 MB in size will will check and see if your current PC meets the minimum requirements and then, automatically download the correct version (32-bit or 64-bit). appropriate for your current system. click here to download You can also choose to create an ISO file from the downloaded file.
The second way is to simply download the ISO directly, if you want to install this on another partition or PC. Select your proper link from below the Product Key for all the below downloadable version of Windows 8 Consumer Preview is : DNJXJ-7XBW8-2378T-X22TX-BKG7J
Available versions
English 32-bit (x86) and 64-bit (x64) 
Chinese (Simplified) 32-bit (x86) and 64-bit (x64)
French 32-bit (x86) and 64-bit (x64)
German 32-bit (x86) and 64-bit (x64)
Japanese 32-bit (x86) and 64-bit (x64)
For more details to download visit Microsofr windows 8 consumer preview 

System requirements for Windows 8 Consumer Preview:
     Windows 8 Consumer Preview works great on the same hardware that powers Windows 7
Processor: 1 gigahertz (GHz) or faster
RAM: 1 gigabyte (GB) (32-bit) or 2 GB (64-bit)
Hard disk space: 16 GB (32-bit) or 20 GB (64-bit)
Graphics card: Microsoft DirectX 9 graphics device or higher
To use touch, you need a tablet or monitor that supports multitouch
To access Windows Store and to download and run apps, you need an active Internet connection and a screen resolution of at least 1024 x 768
To snap apps, you need a screen resolution of at least 1366 x 768
How to make boot-able Usb of downloaded usb Click here

Read More

How to install and use talking tom cat on pc

Hi here is a tutorial how to download, install and run talking tom cat on windows 7 pc
First of all you must have " windows 7 "on your pc then click on the link below to get details how to download and install talking tom cat on your pc Link page Android Apps on pc

Or
Download "BlueStacks from here "
Install it a gadget appear on desktop click on it and now click on talking Tom cat as shown on picture above as it is already install with blue-stacks
you can also use other android application too

            Talking tom running on pc
Read More

Mount OS X HFS partition on windows

How to mount HFS partition on windows.

As we know that windows can mount its own native file system like fat, Ntfs but to mount HFS partition on windows we have to use extra software to access Mac disks from desktop, Windows explorer.We can mount HFS partition as read write with this software can partition, format and repair disk too.As this is not free version you can use trial version.To download the trial version go to the official website Mediafour or click on the link below
MacDrive Standard
After download just install the application and restart your pc lunch the application click on Access HFS partition and then View mac disk in windows explorer your explorer will open and the drive with mac will appear with red apple icon .This is how you can mount mac disk in read write mode in windows.
Read More

Free Automatic Wallpaper changer

Free Automatic Wallpaper changer Deskslide helps you to change your desktop wallpaper according to your schedule may be day or change in seconds or at any interval of time you wish the wallpaper to be changed it is really easy to manage and add the wallpaper that you want for your desktop It is free and supported by Windows 98/Me/NT/2000/XP/2003 Server/Vista.The size of the software is only 732 KB.
To download this Free Automatic Wallpaper changer by George Obada click on the link below
Deskslide

Click here to go to our wallpaper collection

After downloading install the application and lunch it on lunching you will get a configuration wizard Click on next as shown below


After that you will you will get select file location Click on "+" button and navigate to your wallpaper folder select the folder and click on ok (if you have any wallpaper that you don't want to display you can remove it latter manually or you can also add extra new wallpapers) then apply and next as shown below.

 When you click on next you will get select image style like Tile, Autofit, center, etc select the appropriate style and click on next.After clicking on next you will get option when you would like to change the desktop wallpaper this is one of the option i most liked because you can select time range from seconds todays or at every logon etc........ Now click on next and then finish the wizard disappears and deskslide windows remain there click to minimize it to notification area of task bar.
Read More

How to backup Bookmarks in firefox 8.0

How to backup bookmarks in Mozilla Firefox 8.0. As i have already written a blog before to How to backup bookmarks in mozilla firefox for the version 3 and why it is important to backup bookmarks but with the upgraded version there has been a little modification and the location for backuping the bookmark has been changed or say that it has been made easier. For earlier version see this link How to backup Bookmarks So not too much to write just follow the simple steps below
Steps how to backup bookmarks in Mozilla Firefox 8.0
Open your firefox
Go to menu bar
click on Tools or "Alt+B"
Click on Show all Bookmarks or "Ctrl+Shift+B"
New library window will appear
Click on Import and Backup drop-down menu or "Alt+I"
Then click on Export Bookmarks to Html.. or "E" and select the place to save and click on save. that is all your bookmarks are now safe.
If you want to restore your bookmarks
Go to menu bar
click on Tools or "Alt+B"
Click on Show all Bookmarks or "Ctrl+Shift+B"
New library window will appear
Click on Import and Backup drop-down menu or "Alt+I"
Then click on Import Bookmarks from Html.. or "I"browse to the location where you saved your bookmark select it and click on open.
 If you need help leave comment
Read More

How to change label of start button in windows xp

How to change start button in windows XP.
Changing start button label "start" of windows xp is not so difficult. You will just have to follow few simple step as described. I have tested and we can use more then five characters, the only thing is that the size of start button increased.One more thing you can use different labels for Windows classic Style and different label for Windows XP style at the same time.The first thing you need to modify the start button of windows xp is a tool called Resource Hacker by Angus Johnson.Resource Hacker can be used to Analyze, change, add, erase or extract resources in EXE and DLL files. You can download Resource Hacker from the link below .The size of resource hacker is only 2.4 MB and it is Free
CLICK to Download
After Downloading install "Resource Hacker" and now go to your windows installation directory that is C:\WINDOWS and make backup of Explorer.exe just copy and past it to some other place like on your desktop so you can backup if some thing go wrong. Now right click the file explorer.exe and select the second option "Open using Resource Hacker". Now Resource Hacker hacker will open the exe for editing. Now you will see two panels right containing description left containing category's .In the left category panel select the String Table category and click on + sign to expand it in the sub category now navigate down to string 37 if you want to change start button for Windows XP Style and click on + sign to expand it select the language string for English version it is 1033 and click on it now see on right panel for this "Start" change the words inside the inverted comma example "Start" to "NandTech" or as you wish and click on Compile Script. To change the start button for Windows Classic Style just select the string 38 from left panel and rest same as above. Now after compiling script go to menu and select save. If your having error cannot create file C:\wind....\.....exe. Open Task Manager by pressing Ctrl+Alt+Del and select the tab Processes now select explorer.exe and click on End Process your windows will close don't worry still your task manager is open select the Application tab of Task Manager and click on New Task new window appears click on Browse and navigate to the place where you backup the file Explorer.exe now select the file explorer.exe and click on open. The explorer will open.now go to Resource Hacker click ok on error message and try again to save this time you will be success. Now as it is saved successfully to see the changes go to Task Manager >> Processes>>select explorer.exe and click on End Process. Now go to Applications tab of Task Manager>>New Task..>Browse...>>"C:\WINDOWS\explorer.exe" and>>open it .That is all you changed the start button label.of windows Xp.
Windows Xp Style Preview

Windows Classic Style preview
If YOU HAVE PROBLEM POST A COMMENT
Read More

How to backup Bookmarks

How to backup Bookmarks from Mozilla FireFox 3

Bookmarks are very useful to all of us it is a simplest way to remember the important web site that we visit. We always visit new site for searching whatever information we need through search engine like Google, Bing, yahoo etc. and if we find the site is useful we bookmark it.Simplest way to remember but problem arises when we have some problem in our computer and have to format it. Now big problem arises you loss all your bookmark after reinstalling the operating system.But there is one option always backup your bookmarks.
So here is step wise instruction
How to backup Bookmarks from Mozilla FireFox.
Open your Firefox
Click on Bookmarks from menu bar or alt+B from keyboard
Click on organize bookmarks or ctrl+shift+B from keyboard
Library window appears click on "Import and backup" tab or alt+I from keyboard a drop down menu appears
Now select "Export HTML" option or alt+E from keyboard now save window appears save it.
Now you can restore your book mark when ever you need.
To restore all the steps are same only last step changes here to restore back your book mark you will have to select "Import HTML" option or alt+I from keyboard and select the file you saved while exporting.
gow to save bookmark in Firefox 8.0 visit here
Dont forget to leave comment
Read More

Android App on Windows PC

Run Android Apps on Windows PC

Play Android apps on your Win7 PC or tablet with BlueStacks App Player install talking tom cat on pc
At present BlueStacks has released a free version of emulation software that can run Android app on windows 7 pc and tablet and that allows ten applications to run right out of the box, and a further 26 can be added according to the company. At present it is available only for windows 7. Latter on support for Windows XP/Vista /mac may be available.
The first BlueStacks alpha can be downloaded from the official website.
BlueStacks
Don't forget to leave comment
Read More

Download embedded SWF files.

Downloading SFW Files with Firefox
 How to download embedded swf files using firefox. As we know that we need additional software to download swf files that are on webpages but here i am going to show you how to download swf files that are embedded on the webpages without using any additional software.


How to download swf files using Firefox.

  •   Download firefox and install to your pc.
  •   Lunch Firefox and navigate to the Webpage that contains the embedded  swf file.
  •   when the page is fully loaded right click on empty space anywhere on the page and select the page info option. As shown below -
  • On clicking  on view page info page info menu will appear, now select Media from the tab.
  • Now select the swf file that you want to download from the list it's type will be embedded.
  • After selection of the file click on Save As button to save swf file to your computer.see the picture below-

 After download  complete you can simply open with your web browser and enjoy it offline.
Don't forget to leave  comment

Read More

GodMode in windows 8

God Mode works in windows 8devlopers preview

As there are secret Settings in windows7 so also in windows 8 developers preview this secret setting is known as “GOD Mode” in windows7orWindows 8 developers preview.It is just like control panel a folder that brings out a long list of secret settings which allows you to change lots of setting of your windows from the same place.
Here is a simple steps to get GodMode in your computer
Create a new folder on your desktop or on any drive you wish
Rename the folder as NandTech.{ED7BA470-8E54-465E-825C-99712043E01C}
Where ''NandTech'' may be changed according to your own wish
After renaming the folder icon changes automatically same as control panel icon. Now you can explore all the hidden secret by double clicking it. It contains 267 items approx

Is it helpful leave your comments below.
Read More

Nokia Windows Phone 7.5 Mango smartphone

Nokia Windows Phone 7.5 Mango smartphone Lumia 710 & Lumia 800 is Windows mobile smartphone. This phones will come with Full Capacitive touchscreen. It will be powered by 1.4Ghz Processor which will run Windows 7.5 Mango Operating System.

Lumia 710

For specification and more details of Lumia 710 visit link below
http://www.nokia.co.in/find-products/products/nokia-lumia-710/specifications

Lumia 800

For specification and more details of Lumia 800 visit link below
http://www.nokia.co.in/find-products/products/nokia-lumia-800/specifications
more to come .
Read More

How to hide tray item in Windows XP

How to hide tray item in windows xp successfully.
Here is simple steps to hide tray items in windows xp. It can be done in Registry Editor of windows.

Step by step how to hide tray item in Windows XP
From start menu click on run
In the run windows that appears type "regedit"
Go to HKEY_CURRENT_USER\Software\Microsoft\Windows\CurrentVersion\Policies
Under policies there is explorer key open that if not present create it.

Under explorer add new DWORD value Name it as "NoTrayItemsDisplay"
Now edit the value of dword select the base as decimal and put value equal to "1"

All done Log Off and again Log On to see the effect .
To get back the tray icon change the value to "0"
Read More

windows xp, windows vista and Windows 7 language pack

Windows in your own language
       Hi this blog will let you know how to use windows in your own language.
You can install additional languages to windows xp, Windows Vista and Windows 7 to use it in your own language. .Languages pack will work only with a genuine copy of Windows, some languages require a premium edition of Windows or a particular parent language for the installation of language pack.

 Windows XP
To download language pack for  windows xp.

Download link below.

http://windows.microsoft.com/en-US/windows/downloads/languages-xp

Available language pack for Windows xp

        Afrikaans
        Albanian
        Armenian
        Arabic
        Azeri (Latin)   
        Basque (Basque)
        Bengali (India)
        Zosnian (Cyrillic)
        Bosnian (Latin)
        Bulgarian
        Catalan
        Chinese Simplified
        Chinese Traditional
        Croatian
        Czech
        Danish
        Dutch
        English
        Estonian
        Finnish
        French
        Galician
        Georgian
        German
        Greek
        Gujarati
        Hebrew
        Hindi
        Hungarian
        Icelandic
        Indonesian
        Inuktitut
        Irish
        IsiZulu
        Italian
        Japanese
        Kannada
        Kazakh
        Kiswahili
        Konkani
        Korean
        Latvian
        Lithuanian
        Luxembourgish
        Macedonian (FYROM)
        Malay (Malaysia)
        Malayalam
        Maltese
        Maori
        Marathi
        Nepali
        Norwegian
        Norwegian (Nynorsk)
        Pashto
        Persian
        Polish
        Portuguese (Brazil)
        Portuguese (Portugal)
        Punjabi
       Quechua
        Romanian
        Russian
        Serbian (Cyrillic)
        Serbian (Latin)
        Setswana (South Africa)
        Slovak
        Spanish
        Swedish
        Tamil
        Tatar
        Telugu
        Thai
        Turkish
        Ukrainian
        Urdu
        Vietnamese
        Welsh
         
Windows Vista and Windows 7    
         
To download language pack for  windows Vista and Windows 7.

Download link below.

http://windows.microsoft.com/en-US/windows/downloads/languages

Available language pack   
   
    Afrikaans
    Albanian
    Amharic
    Armenian
    Arabic
    Assamese
    Azeri (Latin)
    Bangla (Bangladesh)
    Basque
    Bengali (India)
    Bosnian (Cyrillic)
    Bosnian (Latin)
    Bulgarian
    Catalan
    Chinese (Simplified)
    Chinese (Traditional)
    Croatian
    Czech
    Danish
    Dari
    Dutch
    English
    Estonian
    Finnish
    Filipino
    French
    Galician
    Georgian
    German
    Greek
    Gujarati 
    Hausa (Latin)
    Hebrew
    Hindi
    Hungarian
    Icelandic
    Igbo
    Indonesian
    Inuktitut (Latin)
    Irish
    isiXhosa
    isiZulu
    Italian 
    Japanese
    Kannada
    Kazakh
    Khmer
    KiSwahili
    Konkani
    Korean
    Kyrgyz
    Lao
    Latvian
    Lithuanian 
    Luxembourgish
    Macedonian
    Malay (Brunei Darussalam)
    Malay (Malaysia)
    Malayalam
    Maltese
    Maori
    Marathi
    Mongolian (Cyrillic)
    Nepali
    Norwegian (BokmÃ¥l)
    Norwegian (Nynorsk)
    Oriya
    Persian
    Polish
    Portuguese (Brazil)
    Portuguese (Portugal) 
    Punjabi
    Quechua
    Romanian
    Russian
    Serbian (Cyrillic)
    Serbian (Latin)
    Sesotho sa Leboa
    Setswana (South Africa)
    Sinhala
    Slovak
    Slovenian
    Spanish
    Swedish
    Tamil
    Tatar
    Telugu
    Thai
    Turkish
    Turkmen
    Ukrainian
    Urdu 
    Uzbek (Latin)
    Vietnamese
    Welsh
    Yoruba

Download and install and ready to use window in your own language
Read More

Format USB to NTFS in Windows XP

Format USB to NTFS in Windows XP trick.
To format usb thumb drive to NTFS in windows xp it's very simple. In windows Xp if you want to format usb removable drives by defult you will only get FAT as an option by default here i am going to tell you how to add NTFS to it.As shown below

Open browser by clicking My Computer icon on desktop or from start menu and right click on the usb drive which you want to format to NTFS and select properties as shown below


On clicking on properties a new window will appears now click on Hardware tab and select the drive which you want to add NTFS formatting option and click on properties button. As shown below


On clicking on properties new window will appear there select policies from the tab now select the radio button saying Optimize for Performance and click on ok the window will close again ok and all windows disappear .

Now go back to windows explorer select the drive you wanted to format to NTFS right click select format a window will appear saying format (usb drive name) now see the line saying file system now click on drop down menu and you will have two option FAT and NTFS. Select NTFS and click on start your usb will be formatted in NTFS. As image below.


One important thing of having NTFS file System is that you can carry a single file larger then 4 GB on it which is not possible in FAT formatted usb Drive.
Read More

Windows 8 Bootable USB

Windows 8 Bootable usb

Hi friends
 Today here i am going to write how to make Bootable USB of Windows 8 Devlopers preview.As it is pre-beta version so you can download it for free for final release use your original DVD bought from Microsoft. Here are steps for pre-beta version
          As in previous blog there is a download link of windows 8 Developers preview first off all u have to download the iso image from there.
          Then you will have to mount the downloaded  iso image using some virtual cd/dvd mounter here using
DAEMON Tools.
DOWNLOAD LINK BELOW

http://www.daemon-tools.cc/eng/downloads

This tool is trial for 20 days if you need latter u can buy it. download it and install it reboot your machine after installation now the Daemon Tool icon appears in task-bar see image below


Right click on it and select  

1. Virtual CD/DVD-ROM
2. Device 0:[your device suppose  X:] No media
3. Mount image
          Click on mount image you will get a window now browse your downloaded iso image windows 8 Devlopers Preview and click on open.
Now the image is mounted check it by opening my computer it will appear in Devices and Removable storage as Dvd. Yours suppose x: Drive now you will have to hav 4 GB or above usb thumb drive insert in your usb port backup your data and format it in NTFS recommended Fat32 also works . Latter i will show you how to format usb to ntfs in windows Xp.
   Next the important part Suppose your virtually mounted dvd is X: Drive and your USB thumb Drive is Y: Drive check  your drive letter it is different for all.

Now run command prompt as Administrator
Go to the mounted drive in command prompt as shown below an write the commands given below replace x: and y: with your drive letters.

                   c:\>x:  
            x:\>cd x:\boot
            x:\boot>bootsect.exe /nt60 y:
Now a message will appear saying Bootcode was successfully updated on all targeted volumes.
As in image below
All Done now close the command prompt after that go to My Computer  Explorer your Virtual Dvd Drive here X: Drive and select all the files and folders then copy it then navigate to your usb thumb drive here Y: Drive and paste it. wait for files to be copied 15-30 minutes.

All done 

Reboot machine and boot from usb for installation 

Next coming soon 
Read More